


Images API Overview
Abstract's Image Processing and Optimization API is a simple yet powerful REST API that is used to convert, compress or optimize an image provided via URL or Upload.
Endpoints
An endpoint is the combination of a URI and a method. The following two (2) endpoints require the data parameters to be sent via the POST method. Note that there is a 32 MB maximum file size for each image.
URL Endpoint
If the image you want to resize is already online and indicated by a public URL then you can just include this location in the data payload.
URI: https://images.abstractapi.com/v1/url/
Method: POST
Upload Endpoint
If you want to upload an image from your computer then you can POST the bytes as form-data.
URI: https://images.abstractapi.com/v1/upload/
Method: POST
Authentication
To authenticate your requests you will need to include your API key in the data payload.
API Key
Your API key is a unique text string of about 32 characters used to access any Abstract API. Note that each API key is unique even for a single user; in other words, your Web Scraper API key will be different from your Images API key.
Parameters
The three (3) parameters to allow resize process configuration as described in the documentation:
resize.strategy = "exact" | "portrait" | "landscape" | "auto" | "square" | "fill" | "fit" | "crop"
lossy = true | false
quality =
Payload
The data posted to the API must be in JSON format and might look something like:
{
    "api_key": "5bc14a0987654321qwertyuiopasdfgh",
    "url": "http://example.com/dog.jpg",
    "lossy": true,
    "resize":
    {
        "size": 200,
        "strategy": "square"
    }
}
Pricing
Free plan: transfer of maximum 100 MB / month; 1 request per second.
Getting Started with Abstract API
Before we get to make any API calls we need to first signup with Abstract.
Step 1: Sign-up
Sign up for a free account at https://app.abstractapi.com/users/signup.
If you already have an account then head to the login page.
Step 2: Get the Command
Head to the Images API information portal.
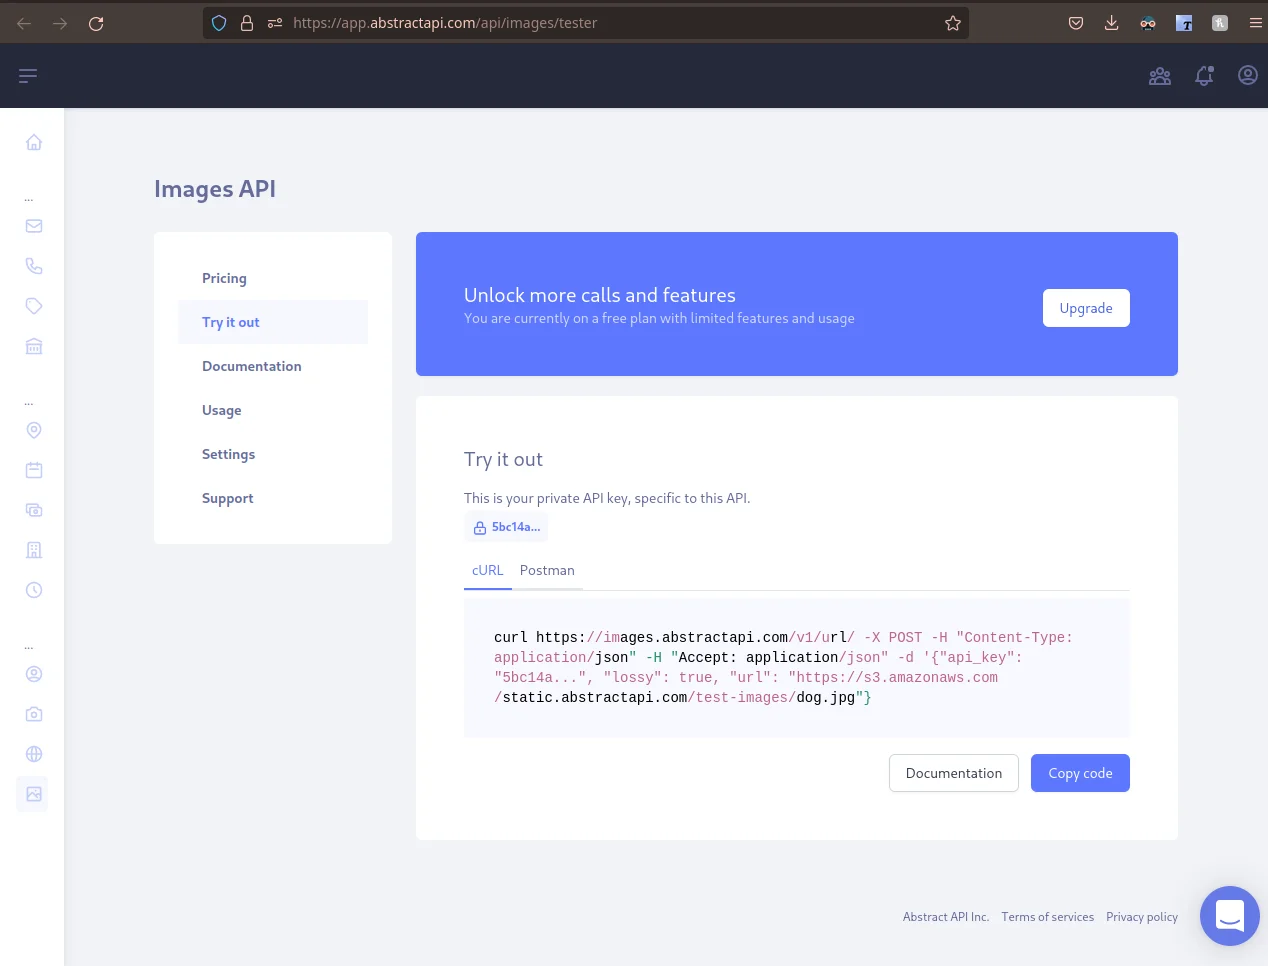
Click on the cURL link to expose the curl command.
Step 3. Analyze the Request
Let's have a look at what the cURL command is doing.
Here is the command as it is meant to be executed:
curl https://images.abstractapi.com/v1/url/ -X POST -H "Content-Type: application/json" -H "Accept: application/json" -d '{"api_key": "5bc14a0987654321qwertyuiopasdfgh", "lossy": true, "url": "https://s3.amazonaws.com/static.abstractapi.com/test-images/dog.jpg"}'
Here it is exploded:
curl
  https://images.abstractapi.com/v1/url/
  -X POST
  -H "Content-Type: application/json"
  -H "Accept: application/json"
  -d '{
    "api_key": "5bc14a0987654321qwertyuiopasdfgh",
    "lossy": true,
    "url": "https://s3.amazonaws.com/static.abstractapi.com/test-images/dog.jpg"
  }'
We pass to the "curl" command the URL at abstract.com the following arguments:
- -X flag with the "POST" method,
- -H flag twice with two (2) headers: "Content-Type" and "Accept",
- -d flag for the data JSON which contains three (3) parameters: "api_key", "lossy" and "url".
Step 4. Make the Request
- press the blue Copy code button to copy it to your clipboard,
- paste it into your terminal.
- Note: at the time of this writing that there is a closing single quote missing from the end of the command. Once you’ve pasted the command into your terminal, add the missing quote mark and press enter to execute.
Step 5. Analyze the Response
The server response provides the file size and dimensions of new image as well as the original image:
{
    "original_size": 205559,
    "original_height": 430,
    "original_width": 1142,
    "final_size": 75101,
    "bytes_saved": 130458,
    "final_height": 430,
    "final_width": 1142,
    "url": "https://abstractapi-images.s3.amazonaws.com/fd36763f6d5448319feee832dee2132c_dog.jpg"
}
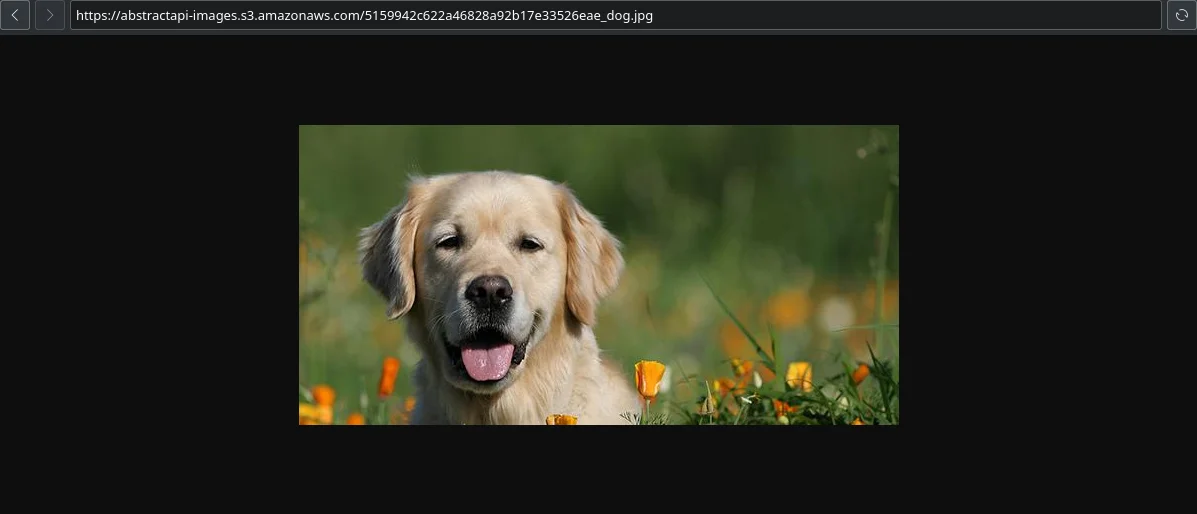
Original image in the request:

Resized image in the response:
Both the request image as well as the response image look the same but since we passed the "lossy": true parameter in the request we can see from the response that we reduced the image file size by over 60%:
"original_size": 205559
"final_size": 75101
"bytes_saved": 130458
If we designate lossless compression via the "lossy": false parameter:
curl https://images.abstractapi.com/v1/url/ -X POST -H "Content-Type: application/json" -H "Accept: application/json" -d '{"api_key": "5bc14a0987654321qwertyuiopasdfgh", "lossy": false, "url": "https://s3.amazonaws.com/static.abstractapi.com/test-images/dog.jpg"}'
we then get less than 12% file size savings:
"original_size": 205559
"final_size": 181512
"bytes_saved": 24047
Python API Example
In this tutorial we will be using the Python programming language. And the version we will be using is Python 3.
You can see if you have Python 3 installed by executing the python binary in a shell:
python --version
It should display something like "Python 3.10.2" which contains a three (3) as the first number which means that you are running Python version 3.
- Sometimes the binary is named "python3", note the "3" on the end.
- If you don't have Python 3 installed you can search for an online REPL.
Interpreter
Python code can run as a script from within a file.
$ echo 'print("Hello World!")' > hello.py
$ python hello.py
Hello World!
Or in an interactive session:
$ python
>>> print("Hello World!")
Hello World!
Note: Prompts legend:
- $ - The dollar sign is used to denote a user command-line prompt.
- >>> - The triple alligator used to denote the interactive Python prompt.
- . . . - The triple dots denote a continuation from the block on previous line.
Most systems expose a Python interpreter by typing python from the command line.
$ python
Python 3.10.4 (main, Mar 23 2022, 23:05:40) [GCC 11.2.0] on linux
>>>
Testing Network Connection
Check to make sure you can connect to the Internet with Python. Enter these commands at the Python prompt:
>>> from urllib.request import urlopen
>>> with urlopen('http://example.com/') as response:
...     print(response.read(100))
This should output the first 100 bytes in a response from example.com:
b'\n\n\n \n\n \n Exit the interactive interpreter session:
>>> exit()
$
Python API Example
Let's resize some images using Python.
Resize Script
Create a file called "resize.py" and enter the following contents:
import json

from urllib.parse import urlencode
from urllib.request import urlopen, Request

from pprint import pprint

params = {
    "width": 400,
    "height": 40,
    "strategy": 'exact',
}
data = {
    "api_key": '5bc14a0987654321qwertyuiopasdfgh',
    "url": 'https://s3.amazonaws.com/static.abstractapi.com/test-images/dog.jpg',
    "lossy": True,
    "resize": params,
}
request = Request(
    'https://images.abstractapi.com/v1/url/',
    data=json.dumps(data).encode('ascii'),
    headers={"Content-Type": 'application/json'},
    method='POST',
)

with urlopen(request) as response:
    pprint(json.load(response))
Imports
The Style Guide for Python Code, a.k.a PEP-8, states:
Imports are always put at the top of the file...
Data
Notice that the data dictionary is composed of another nested dict called params which is declared previously. We will be working with params for the remainder of the tutorial.
params = {
    "width": 400,
    "height": 40,
    "strategy": 'exact',
}
data = {
    "api_key": '5bc14a0987654321qwertyuiopasdfgh',
    "url": 'https://s3.amazonaws.com/static.abstractapi.com...',
    "lossy": True,
    "resize": params,
}
Request
The call to create a new Request object takes four (4) arguments:
- URL of the resource on the server,
- data sent to the server,
- headers sent to the server,
- method dictating which endpoint to use.
request = Request(
    'https://images.abstractapi.com/v1/url/',
    data=json.dumps(data).encode('ascii'),
    headers={"Content-Type": 'application/json'},
    method='POST',
)
Make the Request
At the end of our script we make the request to the server and print the response:
with urlopen(request) as response:
    pprint(json.load(response))
Exact
Execute the file using Python:
$ python resize.py
and you should get something like:
{'bytes_saved': 200959,
 'final_height': 40,
 'final_size': 4600,
 'final_width': 400,
 'original_height': 430,
 'original_size': 205559,
 'original_width': 1142,
 'url': 'https://abstractapi-images.s3.amazonaws.com/8ec7ca1439a64abc95c3561cd8d7b61a_dog.jpg'}
You can view the url field from the response in your browser:
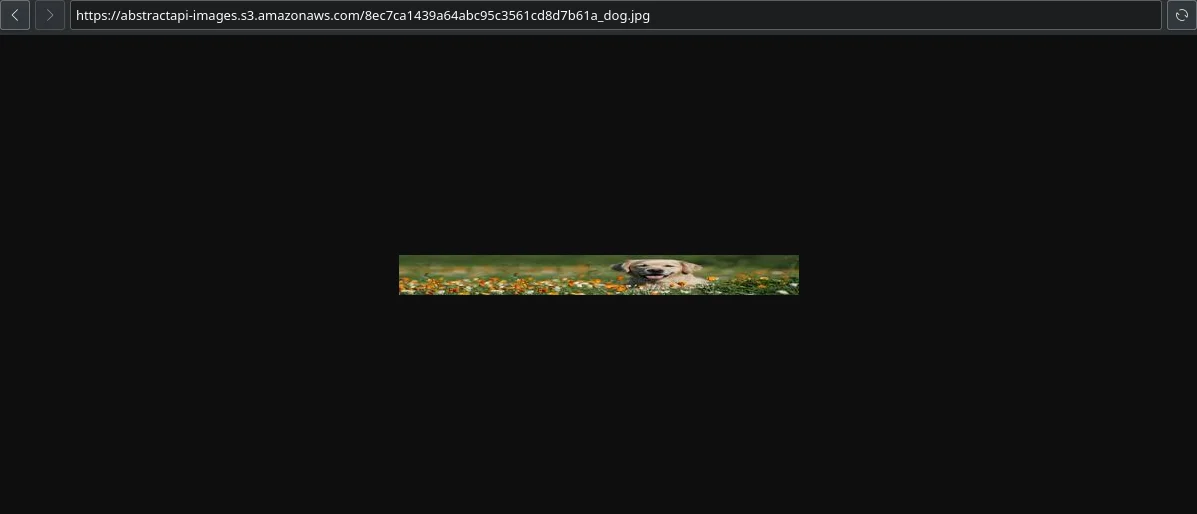

Notice how the image is squished as the original aspect ratio is not respected with the "exact" parameter.
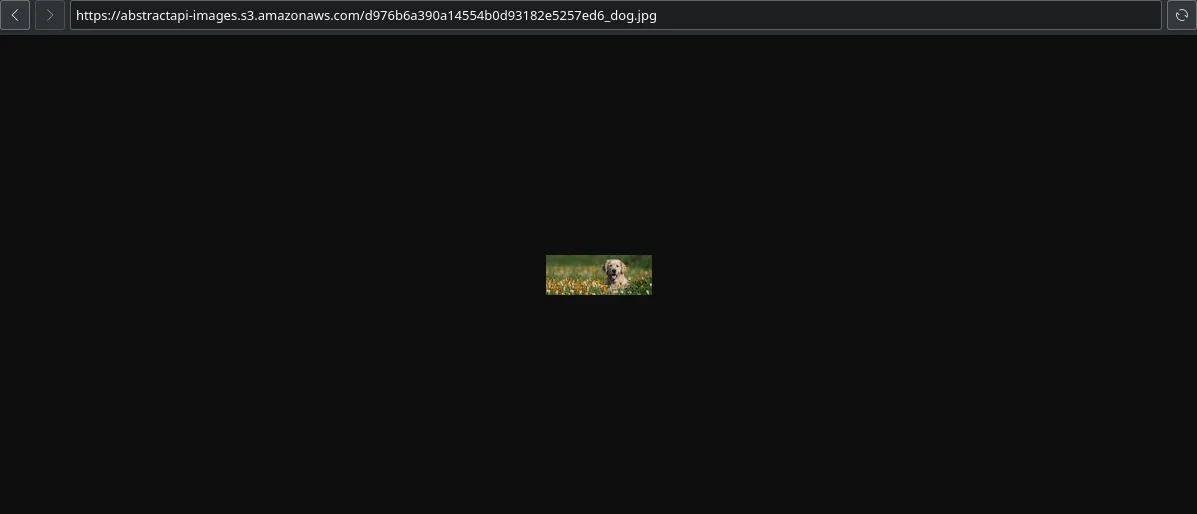
Portrait
The "portrait" parameter does respect the aspect ratio so we just need to give it the height.
Update the params variable in the script to use the new strategy:
params = {
    "height": 40,
    "strategy": 'portrait',
}
Execute the file again:
params = {
    "height": 40,
    "strategy": 'portrait',
}
and you should get something like:
{'bytes_saved': 203909,
 'final_height': 40,
 'final_size': 1650,
 'final_width': 106,
 'original_height': 430,
 'original_size': 205559,
 'original_width': 1142,
 'url': 'https://abstractapi-images.s3.amazonaws.com/d976b6a390a14554b0d93182e5257ed6_dog.jpg'}
Landscape
Now let's try the same for the "landscape" parameter. This time we just supply the width.
Update the params variable in the script to use the new strategy:
params = {
    "width": 400,
    "strategy": 'landscape',
}
Execute the file again:
$ python resize.py
and you should get something like:
{'bytes_saved': 191972,
 'final_height': 151,
 'final_size': 13587,
 'final_width': 400,
 'original_height': 430,
 'original_size': 205559,
 'original_width': 1142,
 'url': 'https://abstractapi-images.s3.amazonaws.com/d9a931b2dbef483885d5a9ecfac5dceb_dog.jpg'}
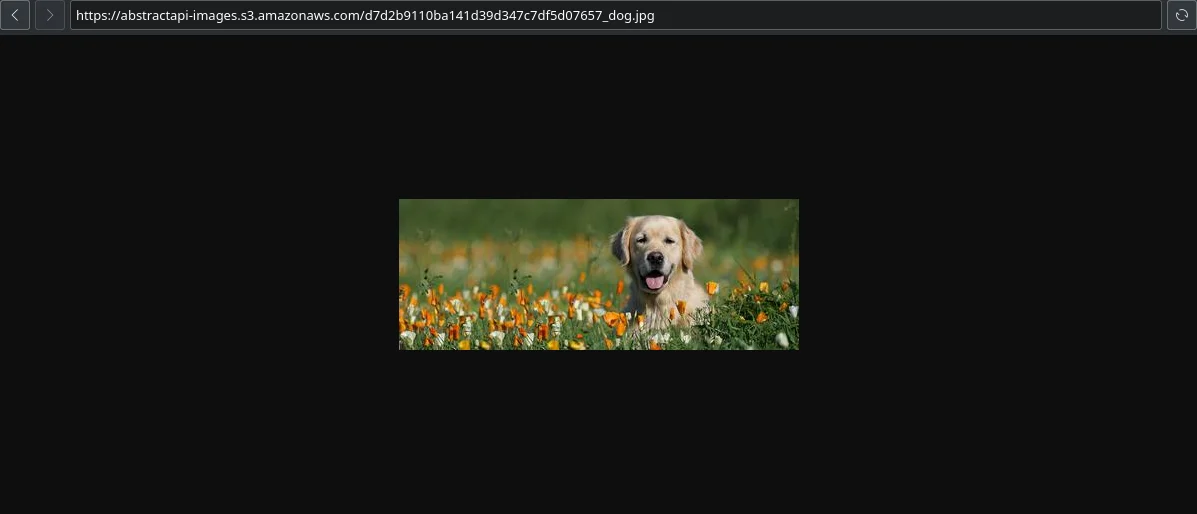
Auto
Using the "auto" parameter the server will determine the best strategy (portrait or landscape) according to the aspect ratio.
Update the params variable in the script to use the new strategy:
params = {
    "width": 400,
    "height": 40,
    "strategy": 'auto',
}
Execute the file again:
$ python resize.py
and you should get something like:
{'bytes_saved': 191972,
 'final_height': 151,
 'final_size': 13587,
 'final_width': 400,
 'original_height': 430,
 'original_size': 205559,
 'original_width': 1142,
 'url': 'https://abstractapi-images.s3.amazonaws.com/d7d2b9110ba141d39d347c7df5d07657_dog.jpg'}
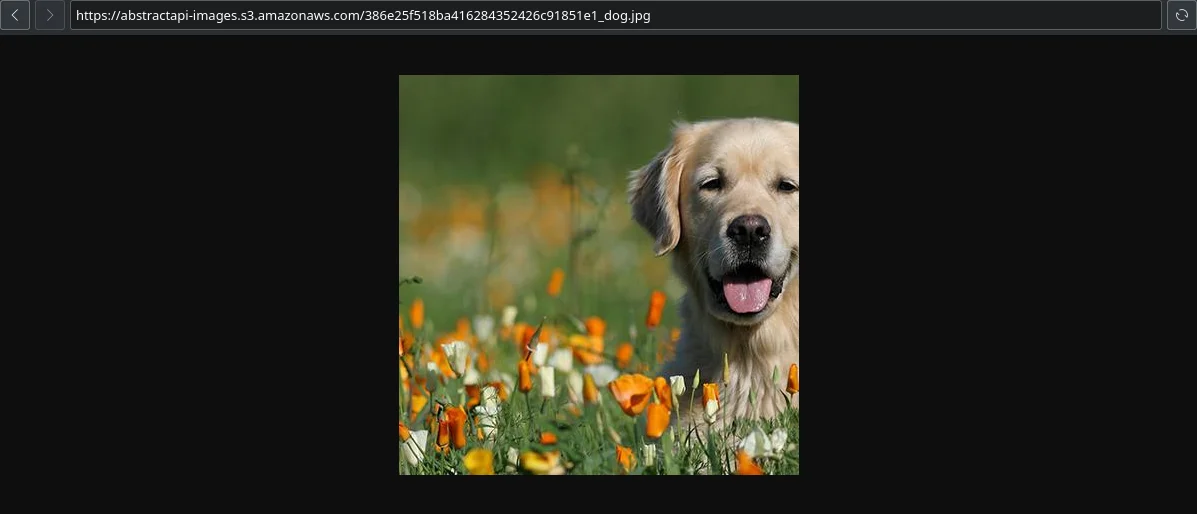
Square
Using the "square" parameter the server strategy will be to crop the image by its shorter dimension to make it a square, then resize it to the specified size.
Update the params variable in the script to use the new strategy:
params = {
    "size": 400,
    "strategy": 'square',
}
Execute the file again:
$ python resize.py
and you should get something like:
{'bytes_saved': 180222,
 'final_height': 400,
 'final_size': 25337,
 'final_width': 400,
 'original_height': 430,
 'original_size': 205559,
 'original_width': 1142,
 'url': 'https://abstractapi-images.s3.amazonaws.com/386e25f518ba416284352426c91851e1_dog.jpg'}
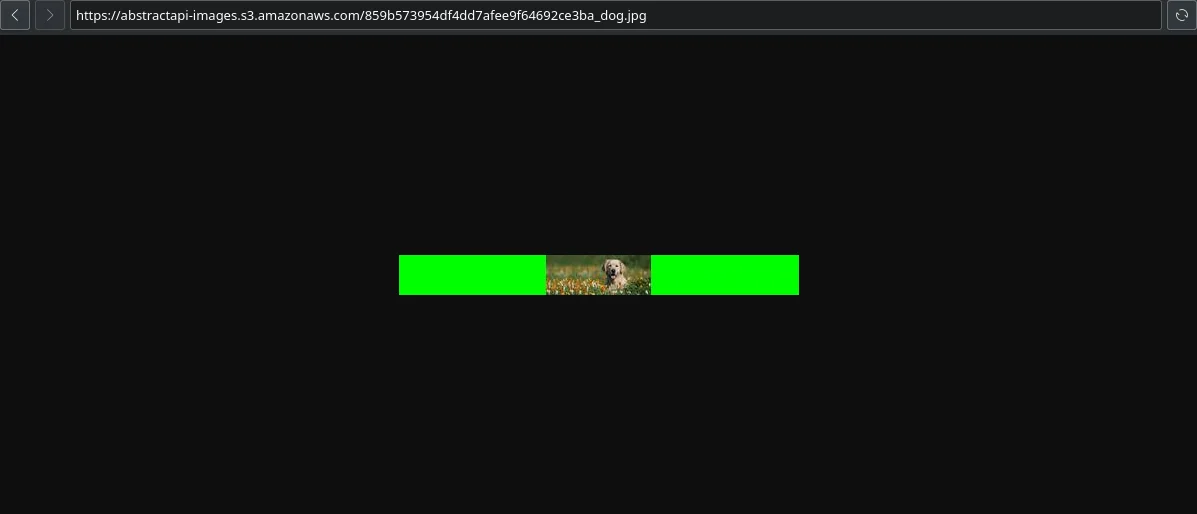
Fill
Using the "fill" parameter the server allows you to resize the image to fit the specified bounds while preserving the aspect ratio. The optional background property allows you to specify a color which will be used to fill the unused portions of the previously specified bounds.
The background property can be formatted as either:
- #0f0
- #00ff00
- rgb(0, 255, 0)
Update the params variable in the script to use the new strategy:
params = {
    "width": 400,
    "height": 40,
    "strategy": 'fill',
    "background": '#0f0',
}
Execute the file again:
$ python resize.py
and you should get something like:
{'bytes_saved': 203596,
 'final_height': 40,
 'final_size': 1963,
 'final_width': 400,
 'original_height': 430,
 'original_size': 205559,
 'original_width': 1142,
 'url': 'https://abstractapi-images.s3.amazonaws.com/859b573954df4dd7afee9f64692ce3ba_dog.jpg'}
Crop Mode
The last two parameters to follow both allow for a "crop_mode" option.
If you want to crop from a direction other than the default "center", you can specify a crop_mode parameter, which can take one of the following gravity (or direction) values:
- nw or tl - North West / Top Left
- ne or tr - North East / Top Right
- w or l - West / Left
- c - Center - this is the default
- e or r - East / Right
- se or br - South East / Bottom Right
- sw or bl - South West / Bottom Left
- s or b - South / Bottom
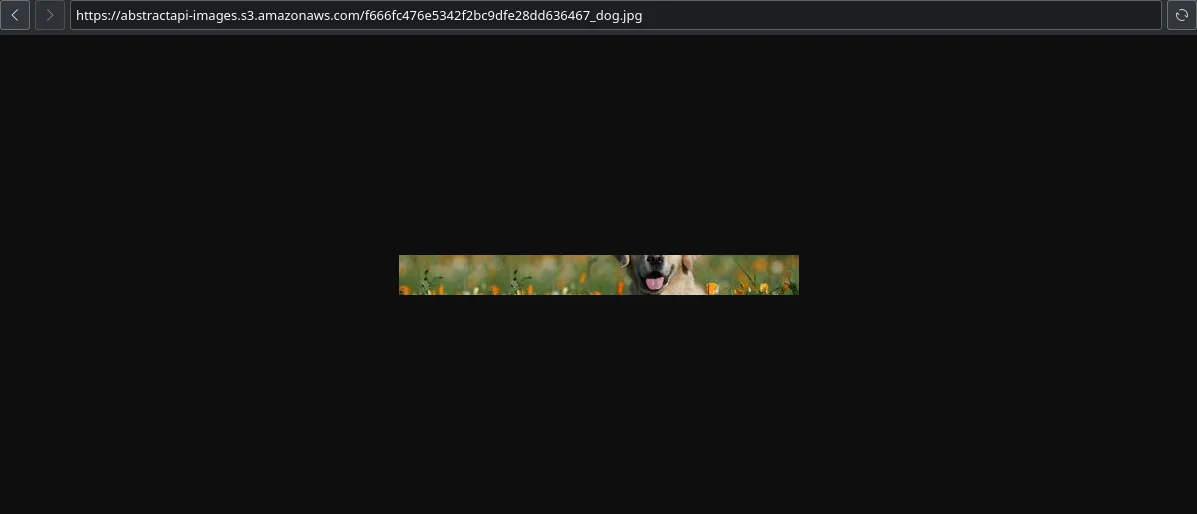
Fit
Using the "fit" parameter the server will crop and resize the image to fit the desired width and height.
Update the params variable in the script to use the new strategy but don't supply the "crop_mode" option yet so the server uses the default value:
params = {
    "size": 400,
    "strategy": 'fit',
}
Execute the file again:
$ python resize.py
and you should get something like:
{'bytes_saved': 202064,
 'final_height': 40,
 'final_size': 3495,
 'final_width': 400,
 'original_height': 430,
 'original_size': 205559,
 'original_width': 1142,
 'url': 'https://abstractapi-images.s3.amazonaws.com/f666fc476e5342f2bc9dfe28dd636467_dog.jpg'}
Now try to use the "crop_mode" option to orient the crop to the top:
params = {
    "width": 400,
    "height": 40,
    "strategy": 'fit',
    "crop_mode": 't',
}
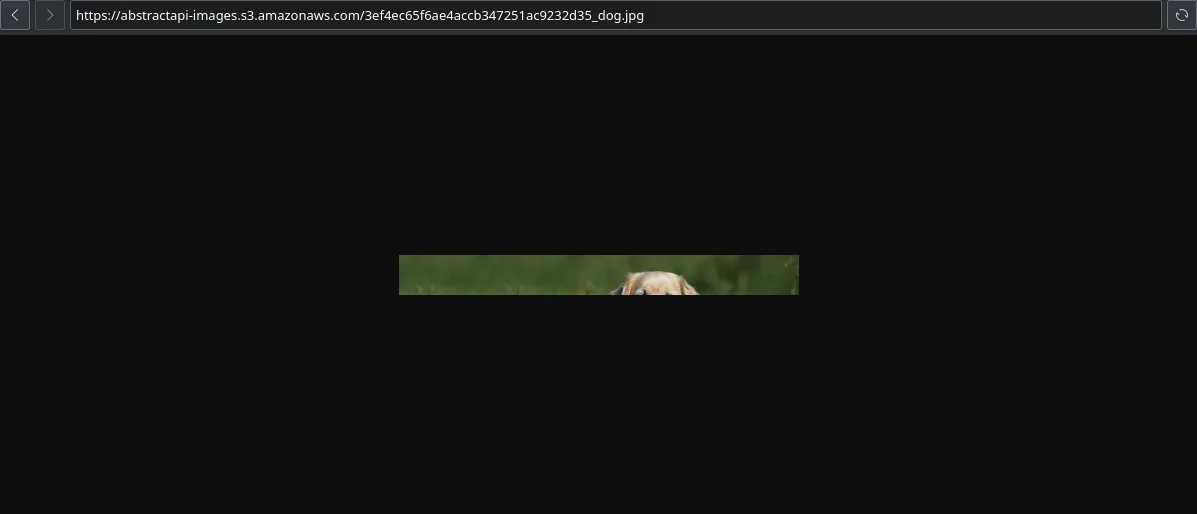
Crop
Finally, the "crop" parameter is the most customize-able so we saved the best for last.
This option will crop an image to the exact size you specify. The resulting cropped image can also be scaled by including the "scale" option, which accepts an integer representing the percentage by which the image should be scaled.
If you would like to crop a custom area from an image, you can do so by specifying the rectangular region you wish to extract with the options: x, y, width and height.
Update the params variable in the script to use the new strategy:
params = {
    "width": 400,
    "height": 40,
    "strategy": 'crop'
}
Execute the file again:
$ python resize.py
and you should get something like:
{'bytes_saved': 203363,
 'final_height': 40,
 'final_size': 2196,
 'final_width': 400,
 'original_height': 430,
 'original_size': 205559,
 'original_width': 1142,
 'url': 'https://abstractapi-images.s3.amazonaws.com/d7d76e89ff064048b75f6d6a3ecaebdf_dog.jpg'}
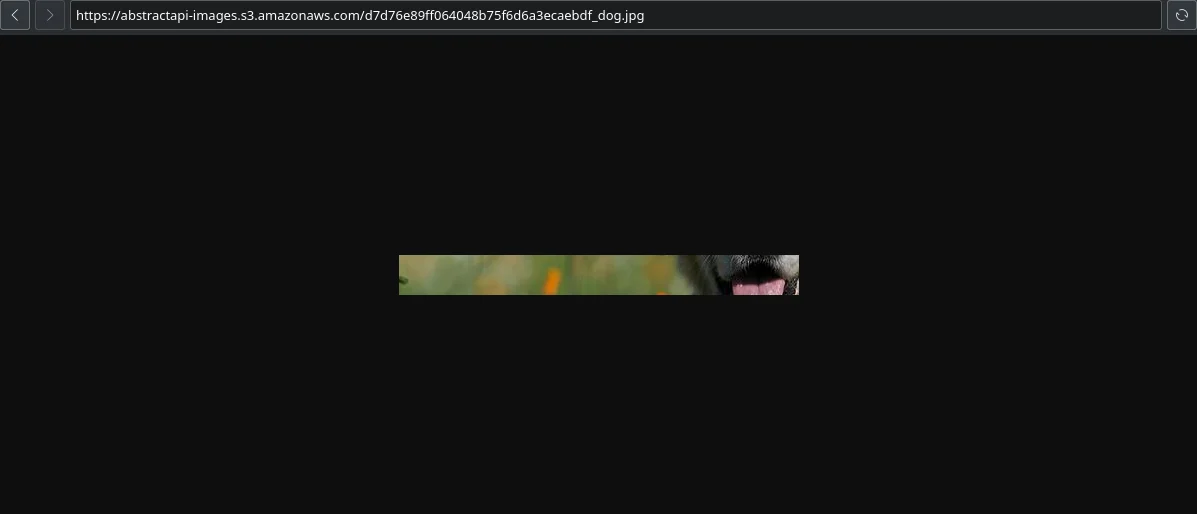
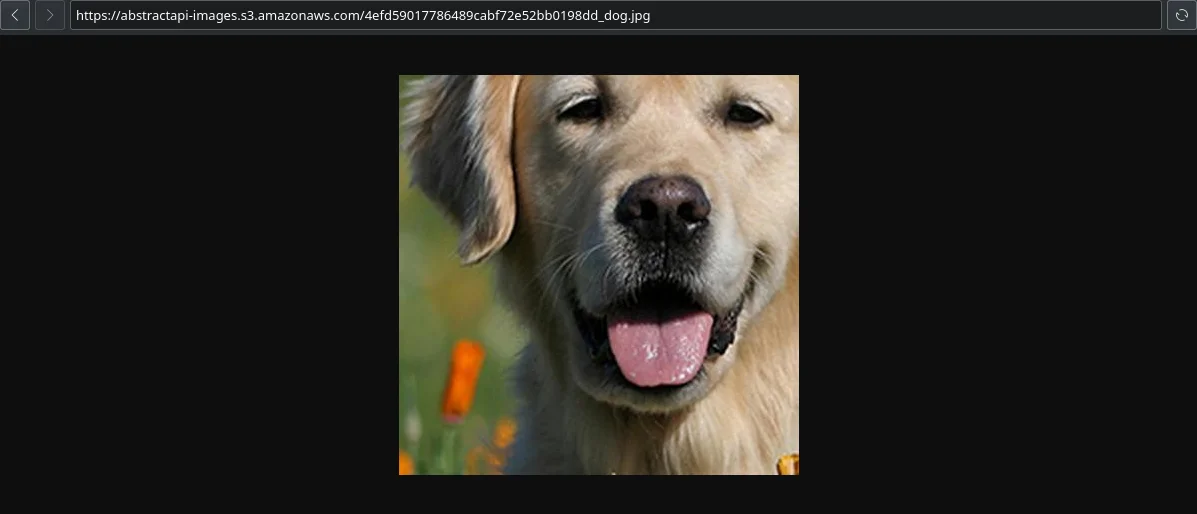
Now try to use the "crop_mode" option to crop the dog:
params = {
    "width": 600,
    "height": 300,
    "strategy": 'crop',
    "crop_mode": 'tr',
}
Now try to zoom in on just the dog's head:
Recap
Here are all the resized images again side-by-side to better see the differences in the use of the parameters.
Wrapping Up
In this tutorial we looked at the main components of the Abstract Images API and how to signup and get an API key giving us access to the resize utility. We resized an image from the command-line and then wrote a Python program to do it from a script file. We used this script to test each and every option to see how they all differ.
FAQ
What is aspect ratio?
The aspect ratio of an image is the ratio of its width to its height, and is expressed with two numbers separated by a colon, such as 16:9, sixteen-to-nine.
What is image processing?
In imaging science, image processing is any form of signal processing for which the input is an image, such as a photograph or video frame; the output of image processing may be either an image or a set of characteristics or parameters related to the image.
What is the Python Imaging Library?
The Python Imaging Library, or PIL for short, is one of the core libraries for image manipulation in Python. It is a free and open-source additional library that adds support for opening, manipulating, and saving many different image file formats.
