

Bootstrap vs React Bootstrap
First, let's quickly discuss the difference between Bootstrap and React Bootstrap. Bootstrap is one of the oldest and most-used CSS libraries for Javascript. It was launched by Twitter in 2009 and gets downloaded close to 2.5 million times every week.
Bootstrap was never intended to be used with React—React hadn't even been created when Bootstrap launched. While it's a powerful JavaScript library, Bootstrap doesn't play well with React. The problem is that under the hood, Bootstrap relies heavily on JQuery to manipulate the DOM, while React uses a virtual DOM to make changes. Any changes that are applied to the DOM with Bootstrap via JQuery do not get picked up by React.
React Bootstrap eliminates the reliance on JQuery and packages all of Bootstrap's native components into pure React components. These components, along with Bootstrap's existing CSS styling and templates, can be imported as React components into a React project.
Getting Started
To get started with form validation, we'll spin up a React app using Create React App and install both Bootstrap and React Bootstrap into the project.
$ npx create-react-app react-bootstrap-form-validation
$ cd react-bootstrap-form-validation
$ npm install --save bootstrap react-bootstrap
Once the dependencies are installed, start up the app
$ npm start
and head to http://localhost:3000 to check that the app is running.
Great! We're ready to start coding. Open up the project in your favorite editor (VS Code is a good choice) and import the Bootstrap stylesheet. This will allow us to use Bootstrap classes on our components and elements. You can also remove the boilerplate code from App.js.
import './App.css';
import 'bootstrap/dist/css/bootstrap.min.css';

function App() {
 return (

     {/* remove everything between the outermost divs */}

 );
}

export default App;
Once our email form validation component is complete, we'll import it into this file and render it between the divs.
Building the Form Component
Create a new file called EmailForm.js next to App.js inside src. This is the file where we'll write all our form validation logic and render the email form component.
Inside the file, import the Form component and the Button component. Create a top-level React component called EmailForm and render the Form component inside.
import Form from "react-bootstrap/Form";
import Button from "react-bootstrap/Button";
export const EmailForm = () => {
return (
)
}
Let's break this down.
The Form component wraps the whole form and allows us to access its children through dot notation. The Form Group wraps separate parts of the form. In this case, we only have one part: the email input. The Form Label allows us to give a label to the form.
The main piece of logic here is the Form Control. By telling this component that we are expecting a type of "email" we have already told React Bootstrap enough to provide us with some basic form validation. We'll see how this validation works in a moment.
Because we've included the Button component inside the Form and given it a type of "submit," React Bootstrap knows that this button needs to do form validation and form submission of the associated form when clicked.
As you can see, we've used some Bootstrap classes (d-flex flex-column align-items-center) on our outermost div to apply some basic styling. This styling comes from the stylesheet we imported in App.js.
Rendering the Form Component
Import your EmailForm component into App.js and render it between the divs
import './App.css';
import 'bootstrap/dist/css/bootstrap.min.css';
import { EmailForm } from './EmailForm';

function App() {
 return (


 );
}

export default App;
and head back to http://localhost:3000 to check out our newly rendered form:
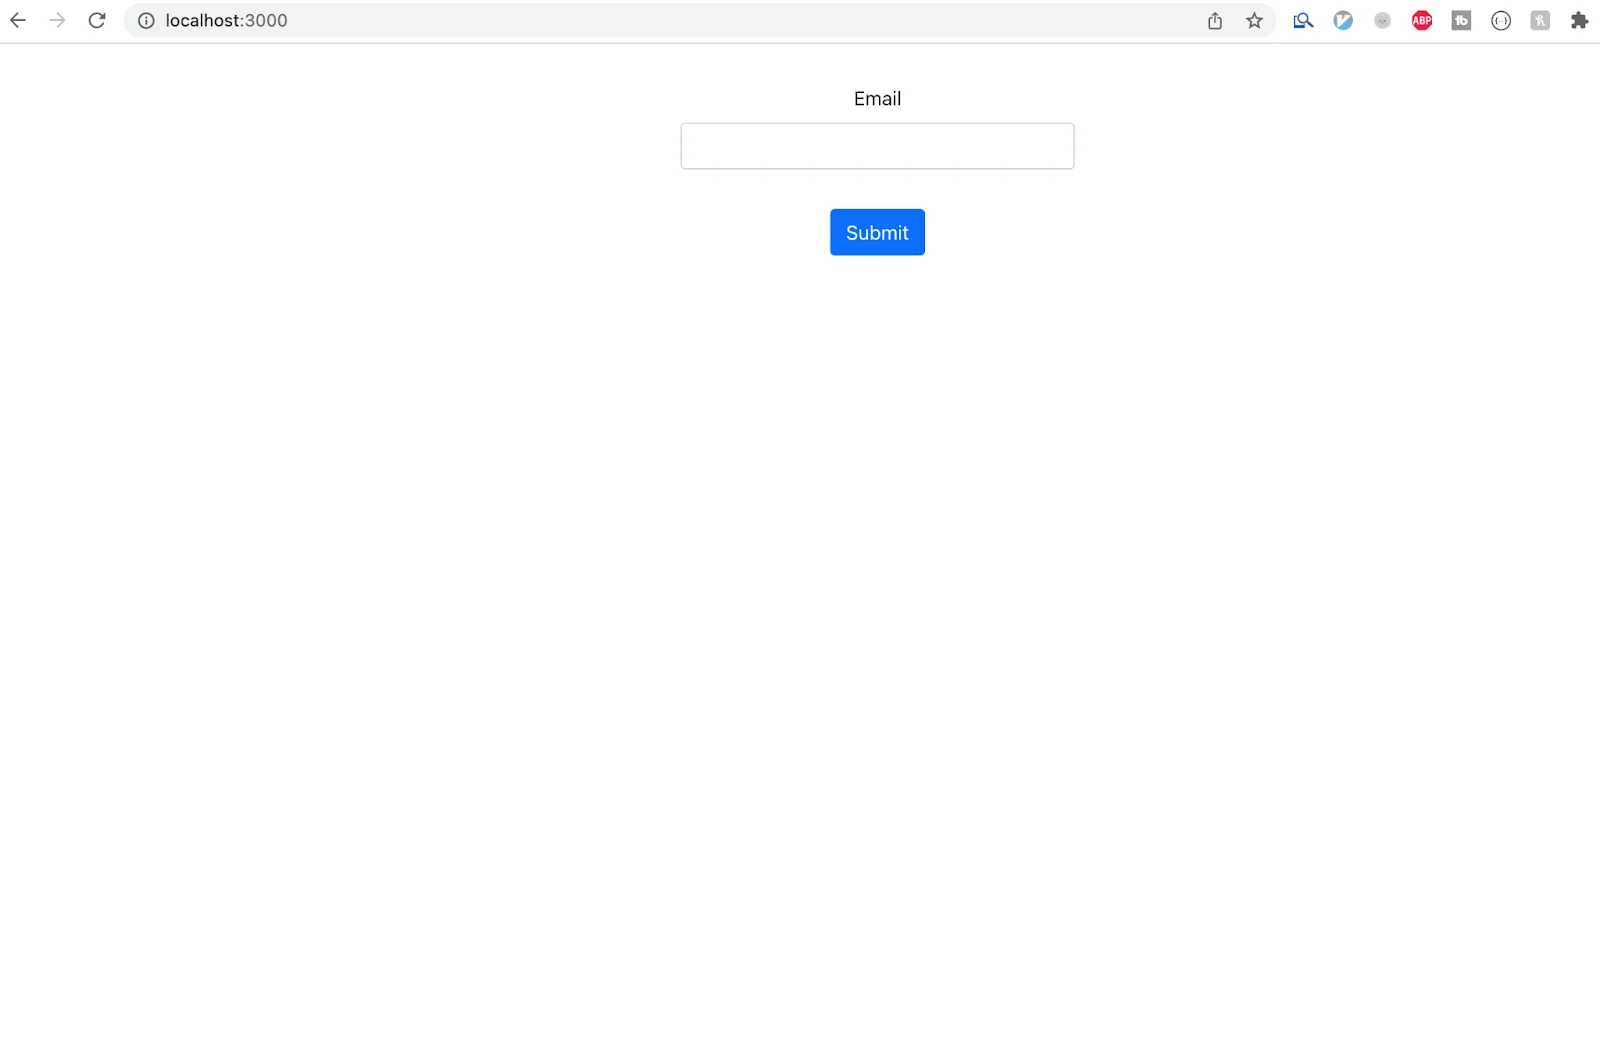
At this point, we'll get some basic email validation right out of the box. Try inputting an invalid email address into the input and hitting the "Submit Form" button.
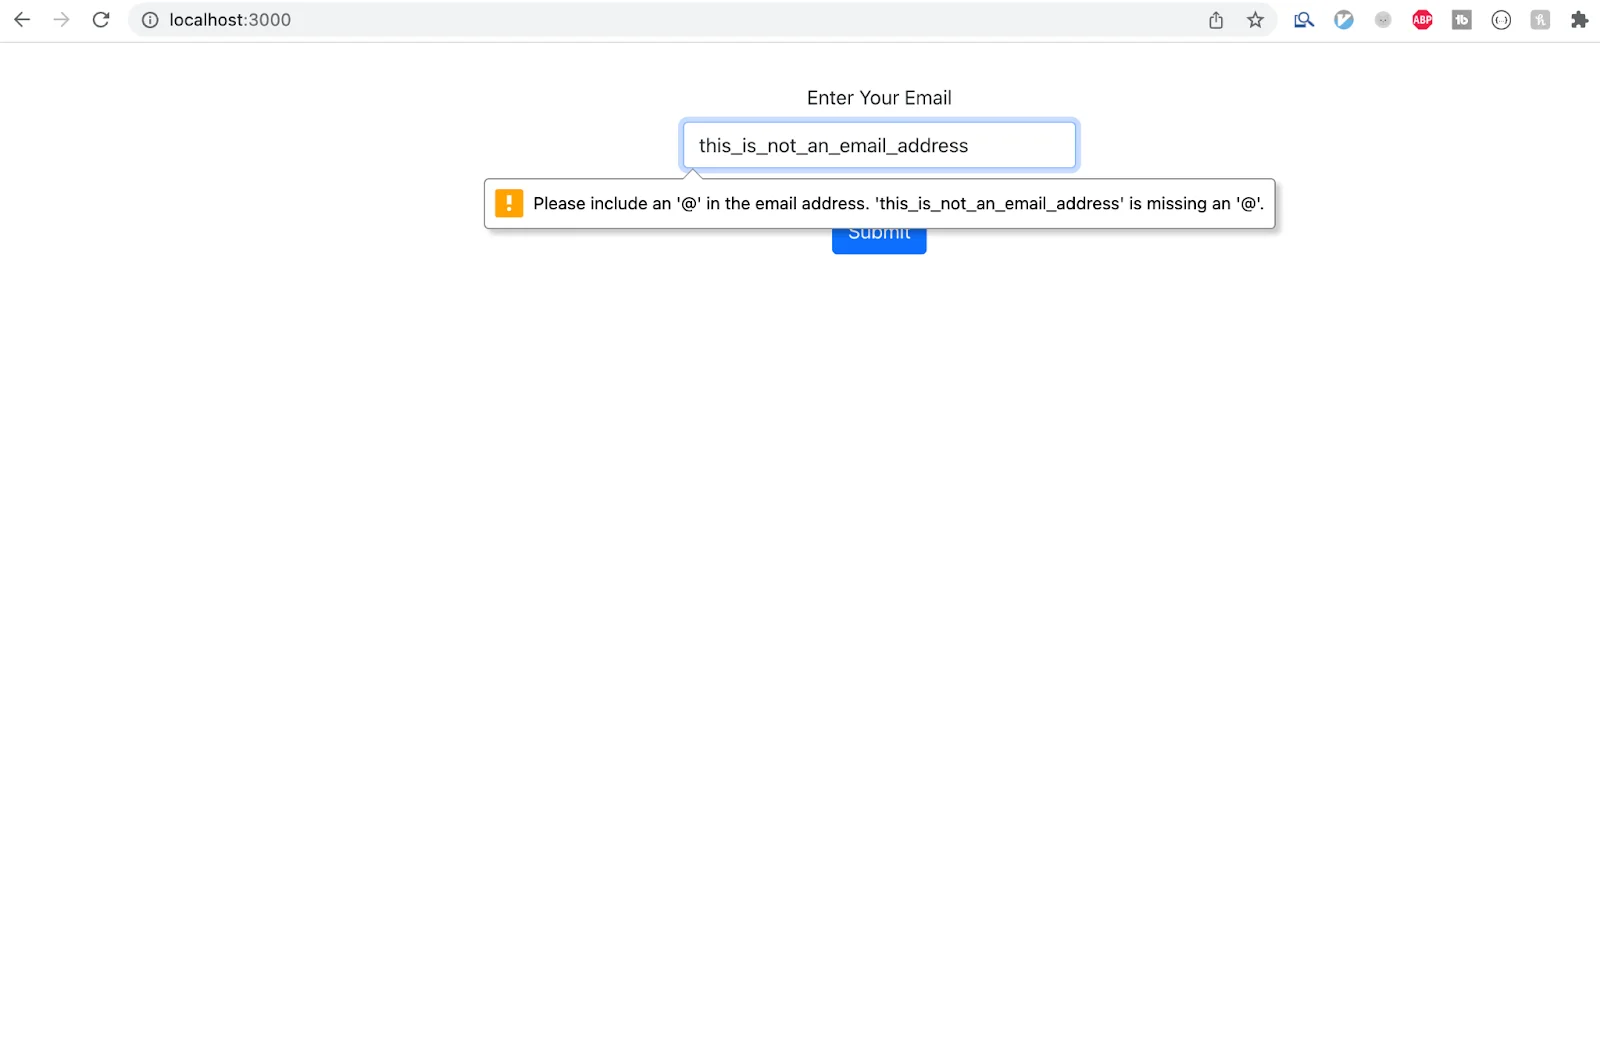
React Bootstrap detected that the email address is missing an expected character, and rendered an error message.
Validating With AbstractAPI
That level of validation is great, but what if we want something a little more robust? A third-party validation API like AbstractAPI's Free Email Validation API can tell us not only if an email is valid, but also give us some more useful information, like whether the address is currently deliverable and if the SMTP is valid, and a quality score for the email.
This tells us not only that the user's input string contained all the expected characters for a properly formatted email, but also whether or not the email actually exists.
Let's add a validation step to check the email input against AbstractAPI before we submit it.
Getting Started With the API
First, let's get set up with an API key. You'll need an API key to use any of AbstractAPI's endpoints. Each API requires a unique key, so even if you've used an AbstractAPI API before, you'll need a new key for this one.
Navigate to the Email API homepage and click "Get Started."
If you've never used Abstract before, you'll be asked to create an account using your email and password. Don't worry—you won't be charged for anything. All of AbstractAPI's endpoints are free to use for development.
Once you've created an account and logged in, you'll land on the API homepage where you'll see your API key, plus links to documentation, a sandbox for making test requests, and support information.
Copy your API key. We're going to use it in the next step.
Adding Custom Form Logic
Right now, Bootstrap is handling all of the form logic for us. In order to validate our email using AbstractAPI, we need to store the email somewhere in the state. We also need to add an onChange handler to update the state when a user inputs their email, and an onSubmit handler to perform the additional validation when the user clicks "Submit Form."
Inside EmailForm.js, create a function called sendValidationRequest. This will handle taking the email our user has input.
...// other imports omitted
import { useState } from "react";
export const EmailForm = () => {
const [email, setEmail] = useState('');
const handleInputEmail = (event) => {
setEmail(event.target.value);
}
const handleSubmitEmail = () => {
console.log("SUBMITTED! ", email);
}
return (
)
}
In real life, the handleSubmitEmail handler would send the email to our backend. For the purposes of this tutorial, we'll just log the email to the console.
Next, we need to add the validation step into our handleSubmitEmail function.
Sending the Validation Request
In order to validate the email with AbstractAPI, we first need to send the email to the API. To do that, we'll need an HTTP client. React comes with the fetch client built-in, and it's available as a global variable. The NPM package axios is another easy-to-use alternative. For now, we'll use fetch.
Next, create the URL where fetch will send the request. Per the AbstractAPI docs, the URL needs to include our API key and the email we want to validate.
const API_KEY = "YOUR_API_KEY";
const apiURL = "https://emailvalidation.abstractapi.com/v1/?api_key=" + API_KEY;
Right now, we're not including the email because we don't know what it is yet. The email will be appended to the URL after the user inputs it, and before we send the request.
Create a function called sendEmailValidationRequest. This is where we'll pull our email out of state and send it to the API for validation.
   const sendEmailValidationRequest = async () => {
       const fullURL = apiURL + email;
       const validationResponse = await (await fetch(fullURL)).json();
       console.log(validationResponse);
   }
The validationResponse will contain the JSON object that the AbstractAPI endpoint sends back. Note that we've used await twice to access the JSON object inside the response: once to await the response from the network, and again to parse the response into JSON.
The JSON object will contain information about whether our email is valid, along with the other information. It should look something like this:
{
  "email": "johnsmith@gmail.com",
  "autocorrect": "",
  "deliverability": "DELIVERABLE",
  "quality_score": 0.90,
  "is_valid_format": {
        "value": true,
        "text": "TRUE"
        },
  "is_free_email": {
        "value": true,
        "text": "TRUE"
        },
  "is_disposable_email": {
        "value": false,
        "text": "FALSE"
        },
  "is_role_email": {
        "value": false,
        "text": "FALSE"
        },
  "is_catchall_email": {
        "value": false,
        "text": "FALSE"
        },
  "is_mx_found": {
        "value": true,
        "text": "TRUE"
        },
  "is_smtp_valid": {
        "value": true,
        "text": "TRUE"
        },
  "quality_score": 0.90,
}
Let's add the sendValidationRequest function as the first step in our handleSubmit function.
   const handleSubmitEmail = async () => {
       await sendEmailValidationRequest();
       console.log("SUBMITTED! ", email)
   }
Next, we need to examine the API's response and use it to determine whether we should submit the email or not.
Using the API Response in Form Validation
The most important part of the API JSON response is the is_valid_format object, which contains a boolean value field. This field will tell us whether or not the email is properly formatted. We only want to submit the email if this field is "true."
Let's return the value of this field from our sendValidationRequest function, and add some conditional logic to check the value of it inside handleSubmitEmail.
   const sendEmailValidationRequest = async () => {
       const fullURL = apiURL + email;
       const validationResponse = await (await fetch(fullURL)).json();
       return validationResponse.is_valid_format.value;
   }

   const handleSubmitEmail = async () => {
       const isValid = await sendEmailValidationRequest();
       if (isValid) {
           console.log("SUBMITTED! ", email)
       } else {
           console.log("EMAIL NOT VALID. ", email)
       }
   }
Great! We've successfully validated an email and used its validity to determine whether or not to send it to our database.
Next, we need to let the user know whether or not their email was valid. We can use React Bootstrap's Form Control Feedback component to do this.
Rendering an Error Message
If the email is invalid, we need to let the user know. We'll add a Feedback component with an error message in it if the is_valid_format.value response from the API comes back "false."
First, we need to create a value in the state to hold our error message.
const [errors, setErrors] = useState({});
As you can see, we're initializing the errors value to be an object instead of a string. Why? We might want to render multiple errors. We'll talk more about this in a moment.
Next, render the Form Control Feedback component below the Form Control component.
{errors.email}
This component will display feedback to the user only if the errors object has an email field that is not "null." It will also render whatever string is present in the errors.email field.
To hook it up to our email Form Control component, we need to utilize the isInvalid field on the Form Control.
Let's add the logic to render the error message.
   const handleSubmitEmail = async () => {
       const isValid = await sendEmailValidationRequest();
       if (isValid) {
           setErrors({...errors, email: null})
           console.log("SUBMITTED! ", email)
       } else {
           setErrors({...errors, email: "Your email is invalid. Please check your input and try again."})
           console.log("EMAIL NOT VALID. ", email)
       }
   }
Here, if the response from the API indicates that the email was invalid, we add an email field to the errors object, and populate it with the error message we want to show our user. If the response was valid, we clear any email error that might have previously been shown and submit the email.
Head back to http://localhost:3000 and try to submit an invalid email.

Note: AbsctractAPI does some clever stuff with autocorrecting. If the user inputs an email like "test@gmail" for example, Abstract will autocorrect the email to "test@gmail.com" and return that the email was valid.
Putting it All Together
Here's what our EmailForm.js file should look like when all is said and done:
import Form from "react-bootstrap/Form";
import Button from "react-bootstrap/Button";
import { useState } from "react";
const API_KEY = "YOUR_API_KEY";
const apiURL = "https://emailvalidation.abstractapi.com/v1/?api_key=" + API_KEY;
export const EmailForm = () => {
const [email, setEmail] = useState('');
const [errors, setErrors] = useState({});
const handleInputEmail = (event) => {
setEmail(event.target.value);
}
const handleSubmitEmail = async () => {
console.log('submitting')
const isValid = await sendEmailValidationRequest();
console.log(isValid)
if (isValid) {
setErrors({...errors, email: null})
console.log("SUBMITTED! ", email)
} else {
setErrors({...errors, email: "Your email is invalid. Please check your input and try again."})
console.log("EMAIL NOT VALID. ", email)
}
}
const sendEmailValidationRequest = async () => {
const fullURL = apiURL + "&email=" + email;
const validationResponse = await (await fetch(fullURL)).json();
return validationResponse.is_valid_format.value;
}
return (
)
}
That's all it takes to get a basic email validation form up and running with AbstractAPI.
Conclusion
There are still many things that can be improved upon here.
For starters, we're not handling errors that might arise from network failures (404, 500, etc.) or other issues that might come up when trying to send a request to the API endpoint.
Next, we could add a loading spinner when the user hits "Submit Form" and disable the "Submit Form" button to indicate to the user that something is happening, and prevent the user from clicking the button multiple times.
Finally, we could hook up the form validation function to be called in the onBlur handler so that the email gets validated before the user hits submit. We could also put it in the onChange handler if we wanted to validate at every keystroke (this would also require us to debounce the request.)
But for now, we've made a pretty good start on form validation for email!
FAQs
What is React Bootstrap?
React Bootstrap is a component library that bundles the styling and reusable components of Bootstrap into pure React components. It allows Bootstrap to seamlessly integrate with React's virtual DOM, rather than relying on JQuery to make DOM updates.
What is the difference between Bootstrap and React Bootstrap?
Bootstrap is a JavaScript framework, released by Twitter in 2011. It is one of the most popular libraries for Javascript, with over 2.5 million downloads every week. Bootstrap is first and foremost a CSS framework that allows you to apply pre-defined classes to DOM elements and then organizes and styles those elements for you. It also exports some pre-made components that can be used inside your web app.
React Bootstrap takes Bootstrap's pre-defined styles and bundles them into reusable React components. You can import these components into your app. Vanilla Bootstrap does not play well with React because of the use of JQuery, which manipulates the DOM. React relies on a shadow or virtual DOM to perform updates, so Bootstrap changes applied to the DOM are not picked up by React.
What is form validation?
Form validation is an important part of frontend web and mobile development. It is the process of ensuring that the input users have given you is correct and well-formatted. An email validation form, for example, checks that the provided email contains all the expected characters (like '@' and '.com') and that it doesn't contain any unexpected characters or malicious scripts.
Form validation not only prevents your users from inputting the wrong information, it protects them and your system from attacks from bad actors.
Frequently Asked Questions
What is React Bootstrap and why use it instead of regular Bootstrap for form validation?
Regular Bootstrap relies on jQuery to manipulate the DOM, which conflicts with how React manages its virtual DOM. React Bootstrap re-implements Bootstrap components as pure React components, so you get Bootstrap's familiar styling and validation feedback patterns without the jQuery dependency. This makes it a natural fit for React projects that need clean, accessible form UIs.
How do you validate an email input in React Bootstrap?
You capture the email value in React state using the useState hook, then on form submission you check the value against your validation logic: either a format check or a request. React Bootstrap's Form.Control accepts isInvalid and isValid props that toggle visual feedback automatically, and the Form.Control.Feedback component displays the error or success message beneath the input.
What is the difference between HTML5 format validation and API-based email validation?
HTML5 format validation only checks that the input looks like an email address; it cannot tell you whether the address actually exists or can receive mail. API-based validation (such as Abstract's Email Validation service) performs SMTP verification and deliverability checks, so you can catch addresses that are correctly formatted but belong to nonexistent mailboxes or undeliverable domains.
How do you integrate Abstract's email validation into a React Bootstrap form?
On form submit, send the email value to the Abstract endpoint using the Fetch API inside an async function. Parse the JSON response and check the is_valid_format.value field to decide whether to show an error. Store the error state in a useState variable and pass it as the isInvalid prop to the Form.Control component so React Bootstrap renders the appropriate feedback styling.
Does email validation in React Bootstrap work with Create React App?
Yes. The standard approach is to scaffold the project with Create React App, then install react-bootstrap and bootstrap as dependencies. You import the Bootstrap stylesheet once in your entry file (typically index.js or App.js), and React Bootstrap components are then available throughout the app with no additional configuration needed.
What happens if a user submits an email like "test@gmail" without a full domain?
Abstract includes an autocorrection feature that completes common incomplete addresses (for example, "test@gmail" is corrected to "test@gmail.com") before validation runs. This means the API can return a valid result for addresses that look malformed at first glance, reducing false negatives that would otherwise frustrate users with legitimate intent.
