
.avif)
mailto - the default client-side email
There is a HTML web standard to send messages: the mailto command. It requires no JavaScript or any special work done on the client side. Here is a form that, when filled out, will attempt to send a message to "recipient@example.com:" using Mailto.
When the "Send" button is clicked the form action fires the mailto with the email address. Mailto opens the default email client on the computer, and applies the subject and the body to the email. There is no need to have your email address in the form - as it opens in your email client.
Here's where the disadvantages come in: this generally fails on mobile devices, and if your customer does not use the default email client on their computer - they may wonder why Apple Mail is opening on their computer.
Another disadvantage is that spammers look for the mailto/email address combination. So in general, the mailto command isn't widely used any longer.
Sending E-mails with JavaScript: EmailJS
We can use JavaScript to send our email messages. However, we cannot use just JavaScript. The reason for this is, yet again, our favorite canned meat product. If developers could just use JavaScript to create bots that send thousands and thousands of messages, our SPAM filters would be working overtime. This is probably a good thing.
Email is sent from a specialized server called an SMTP server, and it uses a port that JavaScript cannot access. Instead, we'll use a JavaScript library that connects via an API to a SMTP server. Let's take a look at one example, EmailJS.
Email JS has two functions that we will need to set up the front-end code, and a backend server (this is hosted by emailJS). To create the front-end code, we will use HTML, CSS, and JavaScript that we will run on our website. When the HTML form is submitted, the data is sent to the EmailJS back end using the email API. We will configure our account on the EmailJS back end to properly route our email to the inbox desired. EmailJS allows you to send 200 messages per month for free, which will be fine for this sample application. If you think you'll be getting a lot of emails this way, you can pay for additional messages.
Let's walk through using EmailJS to send emails from a website. First, we will set up the EmailJS Backend. For simplicity, we'll use a Gmail account to send the emails - this is fine for testing, but there are more robust providers to send emails - you can read more in the EmailJS documentation.
Setting up the EmailJS backend server
1. Create a free account at: https://dashboard.emailjs.com/
2. Select "Email Services" from the left navigation, and go through the steps to connect your Gmail account. Jot down the service_id - you'll need it later.
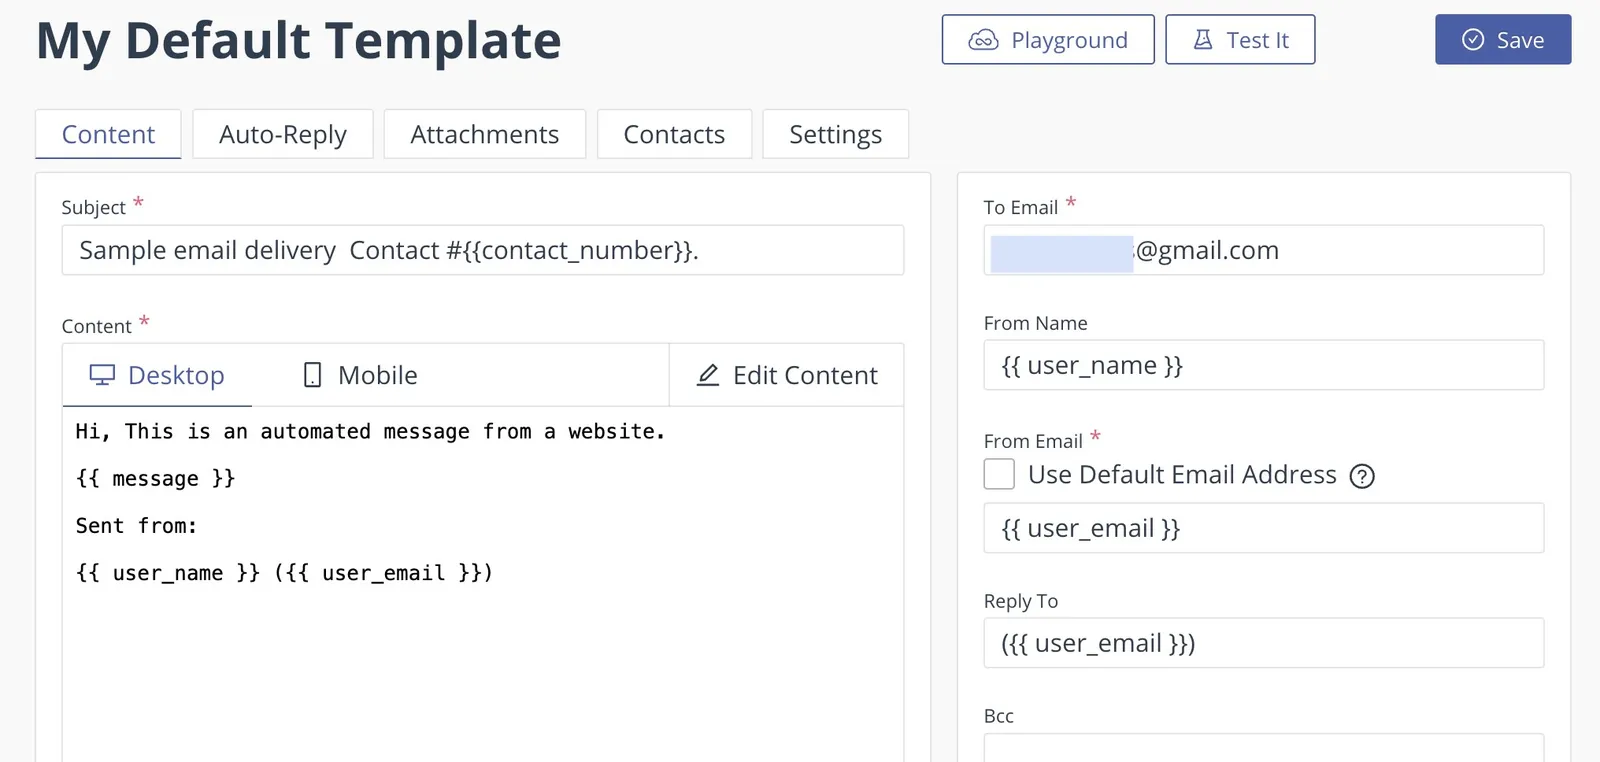
3. Next, we'll create an email template. The email template allows us to define the layout of the email that will be delivered. Click Email Templates, and create a new Template.
- Give the subject:
Sample email delivery Contact #{{contact_number}}.{{contact_number}} is a variable that we will supply from the website form. - Edit the message to appear as follows:
Hi, This is an automated message from a website.

{{ message }}

Sent from:

{{ user_name }} ({{ user_email }})
- If you are using the free plan for emailJS, the "From email" change will do nothing. If you sign up for an enterprise account, the message will appear in your email inbox as if it were from the user's inputted email address.
- The "Reply-to" field does work in the free version, so when you reply to the message, it will go to the user's email address. That way, when you reply to your customers - you know the message is going to them - like we expect it would.
4. The HTML. Here is a sample page that is cribbed from the emailjs tutorial:
5. There are three values to change in this code. From the emailJS dashboard, you'll need your public key (under account). This is a form of authentication, but it is okay to use a public key in code that runs on a remote computer. You'll also need the Service ID and Template ID of the items you just created.
6. Let's walk through how this works. First, we load in the emailJS script:
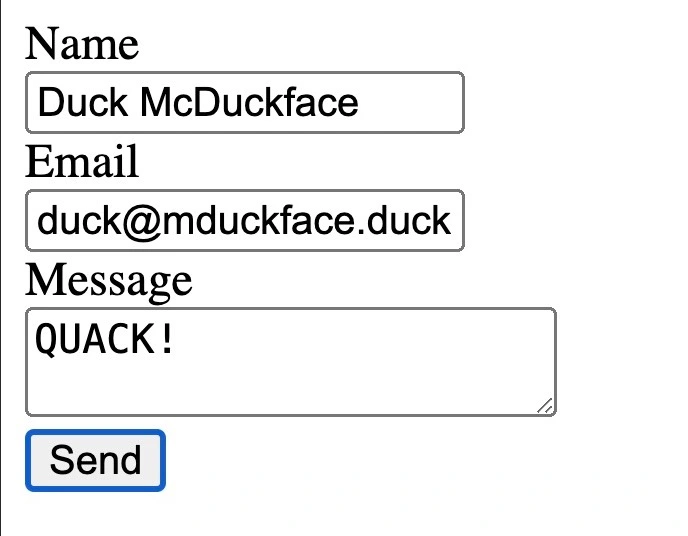
7. Next, let's skip to the body of the webpage. It is a form that takes in a name, email address, and message.
8. Now, let's jump back up to the second script tag. This has an eventListener - when you hit "Send" on the form, this code will execute.
- First, a random contact # is generated. You will recall that there is a {{contact_number}} in the subject of the email template we created. This is where it is created.
- Next, we add in our service_id, and our template_id, and the emailjs.sendform will send the data to the server. If it works, the console will display "SUCCESS!" and if it fails, we'll get a "FAILED..." message.
9. To test your new html page, you'll need to save the file locally (I named the file email.html). You'll also need a web server running to test the code. If you are on a Mac, use the terminal and move to the directory where your file is saved. Start a server as follows:
python3 -m http.server 9000
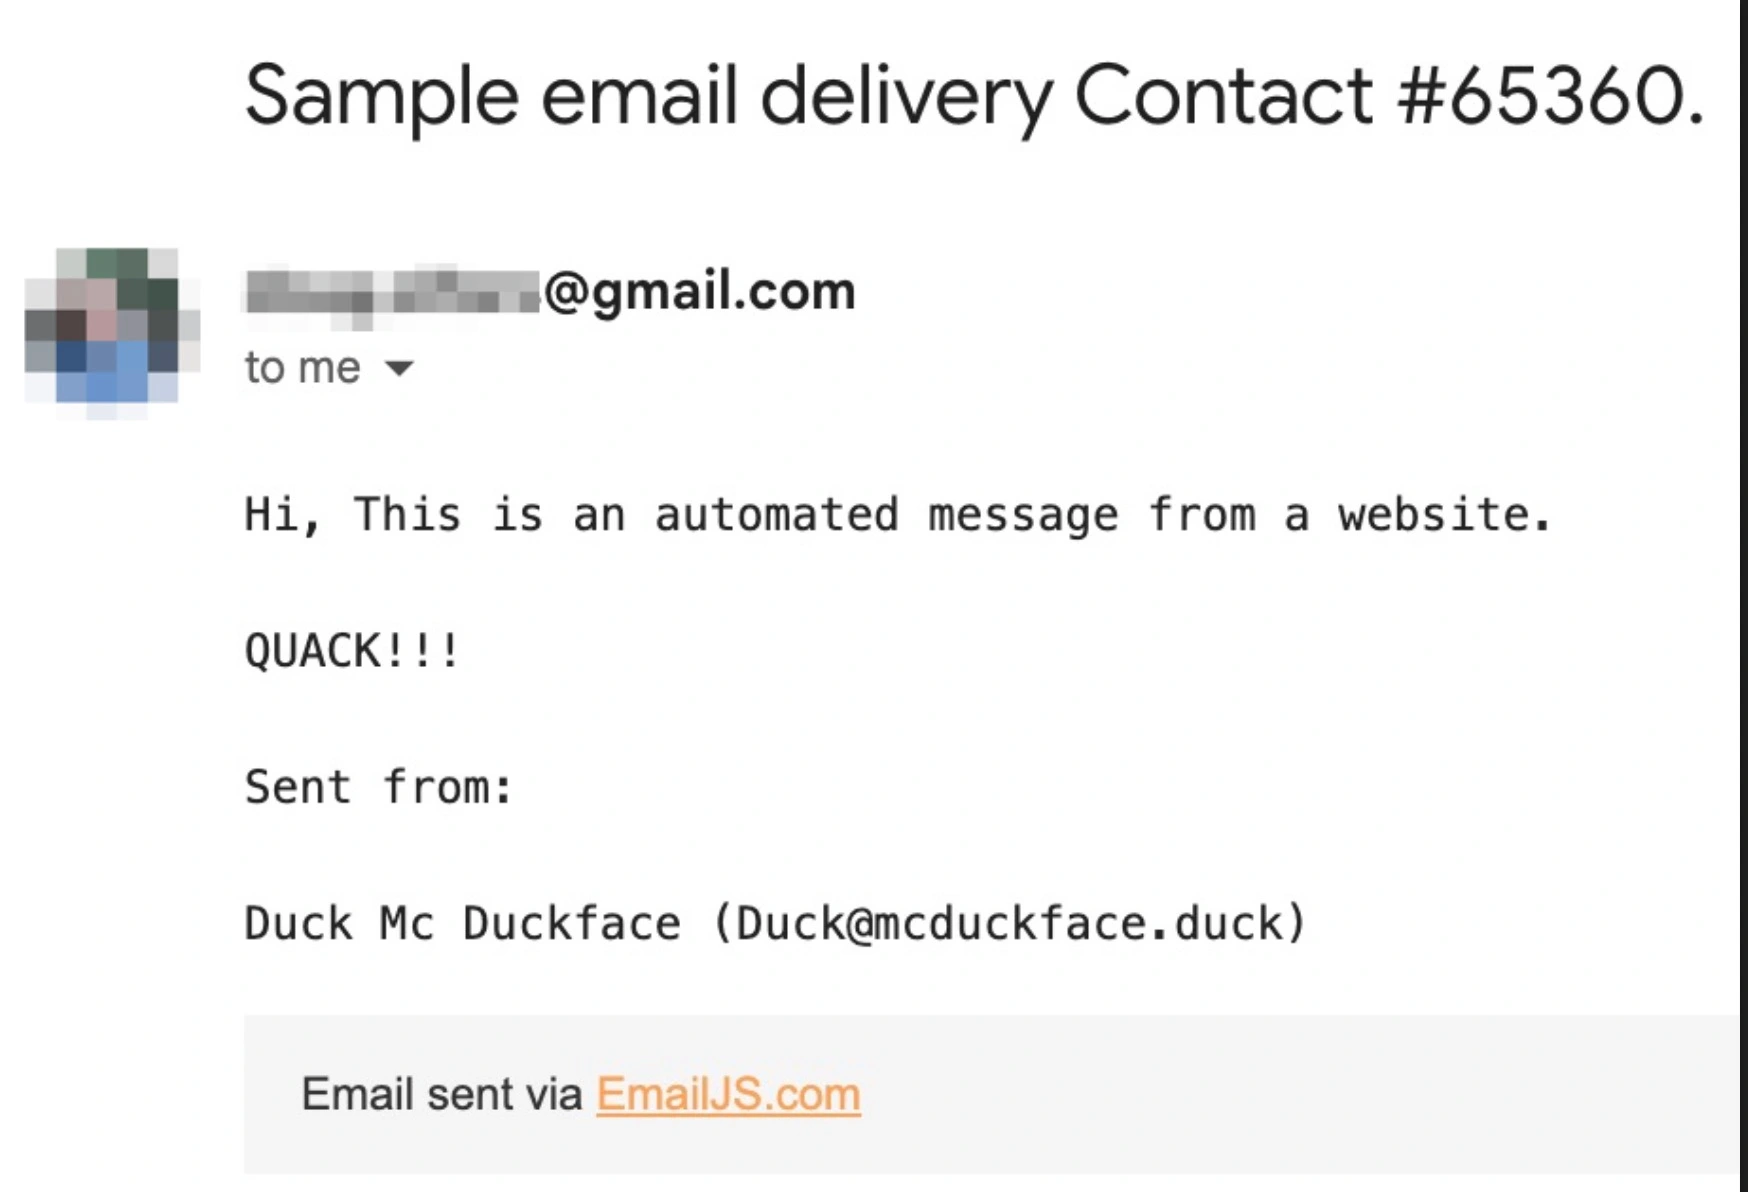
10. In your browser, go to http://localhost:9000/email.html. Your page should load. Fill in the contact form and click send. In a few moments, you should get an email in your Gmail account:
Validate emails with AbstractAPI
Ok, we can see in the image that whoever filled out the form has fibbed about their email address. There is no email account for Duck@mcduckface.duck. I made that email address up.
We don't want people using fake email addresses, and we also want to alert customers if they have mistyped their email addresses. We can use the AbstractAPI Validate Email API to test if emails are deliverable or not.
- Sign up for free at https://app.abstractapi.com/
- Click "Email Validation" in the left navigation.
- The format of the API is as follows:
https://emailvalidation.abstractapi.com/v1/?api_key=&email=
- You can use the "live test" in the AbstractAPI to test an email. Here are two responses, one for my personal gmail account, and the other for duck@mcduckface.duck. I'll just show the first three lines of the JSON response, as that is all we need to determine if the email address can have mail delivered:
{
    "email": "@gmail.com",
    "autocorrect": "",
    "deliverability": "DELIVERABLE",
...
}
{
    "email": "duck@mcduckface.duck",
    "autocorrect": "",
    "deliverability": "UNDELIVERABLE",
...
}
- The API is very clear: one is DELIVERABLE, and the other is UNDELIVERABLE. We can use this API and its response to update our email.html code. We can modify our code in the getEventListener code:
	 			   	const emailInput = document.getElementById('email');
	  			  	const emailValue = emailInput.value;
					api_key = "5558e22f766341a2a915254ca9170495"
					//now we call the apstractAPI email validation
					//build the url
					const url = "https://emailvalidation.abstractapi.com/v1/?api_key="+api_key+"&email="+emailValue
					//here's the field we'll update on response:
					const elementToUpdate = document.getElementById('result');
					//call the url
					return fetch(url)
				    .then(response => {
				      if (!response.ok) {
				        throw new Error(`Network response was not ok: ${response.statusText}`);
				      }
				      return response.json(); // assuming the response is in JSON format
				    })
				    .then(data => {

						console.log(data);
						let deliverable = false;
						if(data.deliverability == "DELIVERABLE"){
							deliverable = true;
						}

				      if (data && deliverable) {
				        // Success steps
				        console.log('email is valid!');
						//send the email
	               	 	emailjs.sendForm('default_service', 'template_to4d4yr', this)
	                   		 .then(function() {
	                  		  console.log('SUCCESS!');
	                 	  	 }, function(error) {
	                        	 console.log('FAILED...', error);
	                    	 });
						elementToUpdate.textContent = 'email sent!';
				        // Perform actions for success
				      } else {
				        // Fail steps
				        console.error('Request failed:', data);
				        // Perform actions for failure
						elementToUpdate.textContent = 'email address not deliverable. Check the address and try again!';
				      }
				    })
				    .catch(error => {
				      console.error('Error during request:', error);
				      // Perform actions for error
				    });


	            });
- Now inside the listener, we make a call to AbstractAPI (using our API key. If the response has deliverability = DELIVERABLE, then we send the email. If not, we ask the user to check the address and try again.
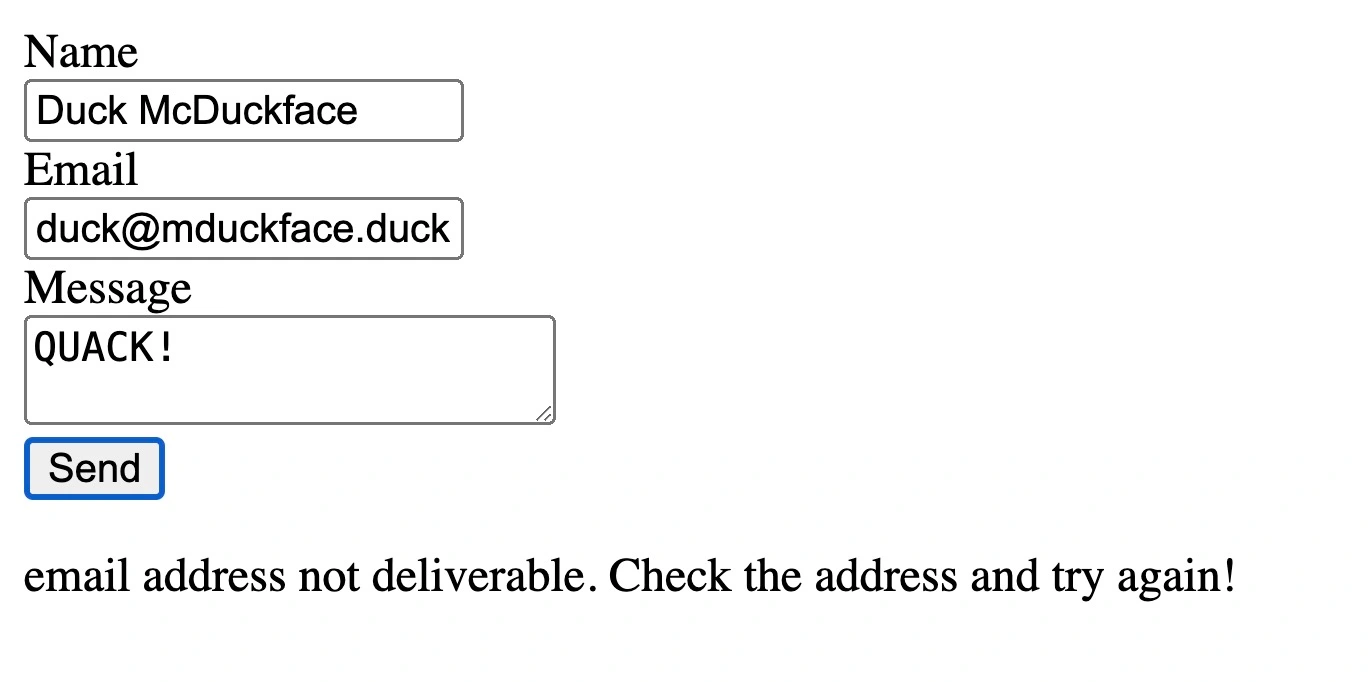
- Running this updated code shows that when there is a validation error, a message is delivered to the user.
Note that this code does execute on your customer's browser, and generally, it is not considered a good practice to send API keys to execution environments where others can see the key. This can be mitigated somewhat with a paid AbstractAPI account, as a key can be locked to a specific domain. So if this application were running at abstractapi.com, we could only allow the key to be used if the requestor is abstractapi.com, but would fail at iamahacker.com. This prevents the API key from being abused by malicious actors. A better use would be to run the email checking and sending code on a backend server - NodeJS would be a good example.
Using EmailJS is a great way to send email messages from the browser, but there are some drawbacks to this method:
- Daily limits to the number of messages that can be sent.
- Gmail accounts are not recommended for use in production.
- API keys that are exposed in the browser can be abused if not implemented correctly.
FAQ
How can I send emails using JavaScript without a server?
Well, there are a few shortcuts we are taking that require API key protection (mentioned in the text). And there is a server: it is the EmailJS server that handles the sending for us.
Can I send attachments this way?
Yes. The form upload allows for attachments to be attached as well. Note that some email clients have limits on attachment size. The EmailJS documentation does not show a limit in size, but the API may return a 413 "too large" error for big files.
Is it ok to put API keys in your client-side JavaScript?
A: If the API keys are properly locked to a domain, it's okayish. Not ideal, not a best practice.. but it works. Totally fine for a demo.
Conclusion
In this post, we discussed 2 options for sending email from a webpage. We first looked at the mailto command and saw several pros and cons of this approach. We then used EmailJS to send emails from the front end of our application using a public key and our Gmail account. We configured the EmailJS back end to customize the from and reply-to fields, making responding the the email an easy process.
Finally, we added AbstractAPI's email validation service to our code. This ensures that the user-submitted email is considered deliverable. If there is an issue, the website throws an error and asks the user to try again.
If you'd like to try AbstractAPI's email validation API, you can sign up for free
Frequently Asked Questions
Can you send email directly from JavaScript in the browser?
No. Browsers block direct access to SMTP servers to prevent spam and protect credentials. To send email from a JavaScript frontend, you need either a third-party service like EmailJS or a backend server (such as Node.js) that handles the actual sending on your behalf.
What is EmailJS and how does it work with JavaScript?
EmailJS is a service that bridges your frontend JavaScript code to an SMTP server without requiring a backend. You connect your email provider, create a template, and call the EmailJS SDK from your browser code. It offers up to 200 free messages per month, but daily limits and API key exposure in client-side code are drawbacks to consider in production.
What are the limitations of using a mailto link to send email in JavaScript?
A mailto link opens the user's default email client rather than sending an email programmatically, so you have no control over whether the message actually gets sent. It also tends to fail or behave unpredictably on mobile devices, making it unsuitable for contact forms or automated messaging workflows.
How can I validate an email address before sending in JavaScript?
You can call an email validation API (such as Abstract's Email Validation) before triggering the send. The API checks whether the address is deliverable and returns a status like "DELIVERABLE" or "UNDELIVERABLE", letting you reject bad addresses early and reduce bounce rates. This check should happen server-side or via a secured request to avoid exposing your API key in browser code.
Is it safe to include an API key in client-side JavaScript for sending email?
No. Any key embedded in frontend JavaScript is visible to anyone who inspects your source code. The recommended approach is to move requests to a backend (Node.js, a serverless function, etc.) that keeps credentials private. If you must use a frontend-only service like EmailJS, enable domain-locking to restrict which origins can use your key.
When should I use a backend like Node.js instead of a frontend email library?
Use a backend for any production application: it keeps credentials secure, removes daily message limits tied to frontend-only services, and gives you full control over email templates and delivery logic. Frontend-only services like EmailJS are fine for quick prototypes or low-volume personal projects, but they are not recommended when Gmail accounts or unrestricted sending are involved.
