

Setting Up Your Environment
In order to send emails with Python, you must first (obviously) install Python and a few needed dependencies. We'll also set up a virtual environment to keep our project organized and stay in line with Python best practices.
Installing Python
The recommended way to install Python in any environment (be it in Mac, Windows, Linux, or something else) is to download the Python installer from python.org. Once you have located the correct download for your machine, follow the instructions to install the package.
Once Python is installed, you can check that it is working correctly by opening a terminal or command prompt and checking the Python version.
Setting Up a Virtual Environment
The first thing we'll do is spin up a virtual environment so that we can install our dependencies in it.
What Is a Python Virtual Environment?
A Python virtual environment is a container that keeps all your code and dependencies for a particular Python project in one place and keeps them separate from the other versions and packages on your computer.
You may need Python3 for one project and Python 2.7 for another, and having multiple versions installed in the global scope can cause issues. A virtual environment lets you run multiple versions of Python for various projects without polluting the global environment.
Let's look at the steps for setting up a Python virtual environment on a Mac. In the terminal, navigate to your new directory and spin up a new virtual environment.
Let's break down this command.
This is our Python version. Here, we're using Python 3. You can also spin up a virtual environment using the command python instead of python3, if you have Python 2.7 installed instead.
This command tells Python to run the Virtual Environment (venv) module. The -m argument stands for module.
Here we're creating a directory for our virtual environment. You can call it whatever you want, but venv is a standard name that many people use because they can easily remember what this folder is when they first open the project
Activate the new environment using the following command
This tells the project to use the Python and Pip versions that are inside the virtual environment. After you run this command, you'll see the following line appear in your terminal:
This means you're using the virtual environment. You are now ready to install your other dependencies.
Installing Necessary Libraries
In fact, you don't need to install any additional dependencies to send emails with Python. Python comes with the built-in smtplib library, which handles running an SMTP server to send and receive emails.
If you like, you can use a framework like Django to build your Python app. Django includes many of its own very useful email methods and modules for both sending and validating email addresses.
Setting Up a Developer Gmail Account
One thing you should do instead to prepare for sending emails is to set up a Gmail account for development. This will be the account that you send and receive emails from, and having a throwaway or separate account will prevent you from inundating yourself with a lot of test emails.
You could instead set up a local SMTP debugging server, which will simply print emails to the console instead of sending them. For this tutorial, however, we'll use a throwaway Gmail account instead of a local SMTP server.
After you set up your Gmail account, make sure to turn the "Allow Less Secure Apps" option to ON. This lets your app connect to the Gmail server without having to go through a complicated OAuth procedure.
Connecting to Your Email Server
Now it's time to connect to our mail server. First, let's look at what an SMTP server actually is.
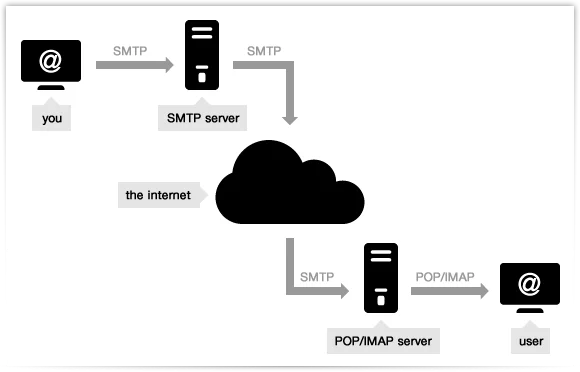
SMTP (or Simple Mail Transfer Protocol) is the communication protocol that handles email. SMTP handles email traffic in the same way that the HTTP (Hyper Text Transfer Protocol) handles app data.
IMAP works in tandem with SMTP to retrieve email message data. IMAP is for email retrieval while SMTP is for email sending.
The most important job that an SMTP mail server does is to prevent spam and create a secure connection. Email addresses and email content are sensitive and should be handled carefully.

How Does an SMTP Server Work?
An SMTP server works in the following way:
- The server receives the email information (the content, the sender address, the recipient address, and any other metadata) from the mail client on Port 25.
- The server separates the addresses of the sender and recipient into two parts: name and domain.
- In the email address abstractapi@gmail.com, the name is abstractapi and the domain is gmail.com
- The server examines the two domains. If they are the same (i.e. gmail.com) it uses that domain's sending agent to push the email to the recipient.
- If the domain of the sender's address and the recipient's address is not the same, the server first checks that the sender’s email address is a valid email. This prevents spam.
- If the sender’s address is valid, the sender's SMTP server pushes the email data to the recipient’s SMTP server. The recipient's IMAP server delivers the email to the recipient's mail client.
Setting Up an SMTP Server With Python
When sending emails with Python, it's important to encrypt your SMTP connection to prevent bad actors from accessing email message content. There are two ways to encrypt an SMTP connection: using SSL (Secure Sockets Layer) or using TSL (Transport Layer Security.)
In this tutorial, we'll import smtplib to create a secure SMTP connection using SSL. We don't need to worry about securing the remote SMTP server, as Gmail will handle that. The following code snippet creates a secure connection from our local SMTP server to Gmail's SMTP server.
That's it! You have set up your own SMTP server and you're now ready to start sending emails with Python.
Composing Emails
The most basic form of email sending you can do with Python is to send plain text emails. Let's look at that first, then we'll take a look at sending an HTML message.
Sending Plain Text Emails
Once you have created your server instance, you can use the instance method called sendmail to send emails:
It's best practice not to include sensitive information like email addresses in your code. Instead, define them in a secrets file and import them into the needed module.
When creating your message body, you can tell Python to treat part of the message string as the subject and the rest as the message body by separating the string with newlines, as in the following code snippet:
Sending an HTML Message Body
Sending a simple text string message is one thing, but it doesn't allow you a lot of flexibility in how your email is displayed. For that, you need to use HTML to format the message body.
Fortunately, Python has a very handy email module that lets us include HTML and other fancy formatting like bold and italic text in our message bodies. However, since some people prefer plain text emails for security reasons, and some email clients don't display HTML, you need to include a plain text fallback.
For this, we use the MIME standard (Multipurpose Internet Mail Extensions.) This lets us send a multipart email with both HTML and plain text versions.
We can use the email.mime.text and email.mime.multipart functions to do this.
Personalizing Your Emails
So far, all we've done is sent a static text string to our recipient's email address. But what if we want to include some dynamic content? After all, you probably want to at least address your users by name.
Adding personalized content to emails is easy - you just need to include placeholders in the text strings for the relevant information, and use str.format() to pass the variables:
Creating Personalized Templates
Obviously, you will have more than one user in your customer database! How can you create an email message that will send to multiple recipients and customized for each user?
The easiest way is to pull in a CSV file containing the names and email addresses of your users, then loop over each row of the file and pull the relevant details out to include them in your message string. Check the following Python code:
Automating Emails With a Python Script
If you need to send emails regularly, you can automate the sending of them with a Python script. The schedule module, which can be installed via Pip, allows you to call a particular function at regularly scheduled intervals.
In order to use the module, simply define your email-sending function and give it a name, then pass it to the scheduler and specify the interval at which the function should be called.
Best Practices
There are some things you can do to improve your email sending and ensure a good experience for your users.
The most important thing to do is to make sure you handle your users' sensitive data carefully. Establishing a secure SMTP connection is the best way to do this. Make sure you follow all authentication protocols and don't store sensitive information like passwords and email addresses in code. Instead, keep them in a secret file.

Next, follow email-sending etiquette. If you're scheduling emails for automated sending, make sure you're not spamming your users.
Finally, to improve open rates and increase your reputation as a sender, practice writing good subject lines and including valuable information and links in your emails that encourage users to click on things and reply to you.
You should also clean your email list regularly to prevent spam and fake addresses from clogging up your list. Sending emails to invalid addresses hurts your open rates and your reputation as a sender.
Related: Free email cleaning solutions
Validating Email Addresses
To ensure all the addresses on your list are valid, use a validation service like AbstractAPI's Email Validation API to vet email addresses before users even join your list. You can also use the API's bulk validation option to regularly clean your email list and purge invalid addresses.
Let's take a quick look at validating email addresses with AbstractAPI. You can include this in the signup step when your users enter their information into a form on your website.
Acquire an API Key
Go to the AbstractAPI Free Email Validation API homepage and click on "Get Started."

Once you’re in, you’ll see your API key and links to documentation and pricing.
Send a Validation Request to the API
Use the Python requests module to send a request to AbstractAPI. You'll need your API key and the AbstractAPI URL (found on your API dashboard.)
Write a function called validate_email that accepts an email as a parameter and sends it to the API for validation.
Take a look at what you get back from the API. It should look something like this:
You can now use the information in this JSON response to determine whether the email address is valid.
Transactional Email Services
If you need to send emails very frequently, you may want to consider using a transactional email service instead of rolling your own SMTP server. Transactional email service providers offer SDKs that can hook into your Python code and handle the sending and receiving of emails for you.
Some of the most popular transactional email services that are easy to integrate with Python include:
- Sendgrid
- Mailgun
- Sendinblue
- Mailjet
- Amazon SES
Error Handling
Error handling is an important part of building a user application. When something goes wrong, a user should know. It's also important to log errors so that developers can access those logs later to see what happened and fix the issue.
Use the Python try and catch blocks to catch errors when they occur and surface them. At the very least, you should log the error message to a file. If the error affects the user, you should also show a human-readable error message to the user.
The Python email module includes its own error method, which you can use to catch errors as well. Check the Python docs for in-depth information on how to use these methods.
Conclusion
Sending emails to your users is an important part of a user-facing application or website. Python makes it very easy to send emails with the smtplib and email modules. Use smtplib to create your own SMTP connection and handle the encrypting of that connection.
Once you have established an SMTP connection, use the email module to create both plain text and HTML message bodies that can be sent via the MIME standard to any email address.
Use a Python script or the schedule module to handle the automation of sending emails. If you need to send emails very frequently or send a lot of emails, it may be worth looking into a transactional email service to handle email sending for you.
FAQs
What is the best library for sending emails with Python?
The easiest way to send emails from a Python app is to use the built-in smtplib and email libraries that come with Python. This will allow you to create your own SMTP connection and generate plain text and HTML content.
If you need to send many messages or automate a lot of sending, look into Mailgun, Mailjet, or another transactional email service.
How do I handle email attachments in Python?
Adding attachments to emails in Python is easy. The Python email module includes an encoder that can encode binary files into base64 before they are sent as attachments. Once you have encoded the data, use the add_payload function to attach the file to the message.
Email clients will automatically download the attachment.
Can I send bulk emails using Python?
Yes. The easiest way to do this is to keep your user data (email addresses and names, etc.) in a CSV file, then import the file into your email package modules and loop over the rows to add the needed information dynamically to each message being sent.
How can I test my email-sending script before using it in production?
Python allows you to create a local SMTP server for test message sending, which will simply print email messages to the console without actually sending emails. You can start a local SMTP debugging server using the following Python code snippet:
You can also create a throwaway Gmail account and send your test message emails to that.